> ## Documentation Index
> Fetch the complete documentation index at: https://docs.kode.diy/llms.txt
> Use this file to discover all available pages before exploring further.
# ESP32-S3
> Know the microcontroller that gives life to the Kode Dot and its state control.
# Features
The **ESP32-S3** is one of the best microcontrollers of **Espressif** that incorporates a **double core XTensa LX7,** capable of running up to **240MHz**. In addition, it integrates **2.4GHz** connectivity with support for **WiFi** and **Bluetooth LE**.
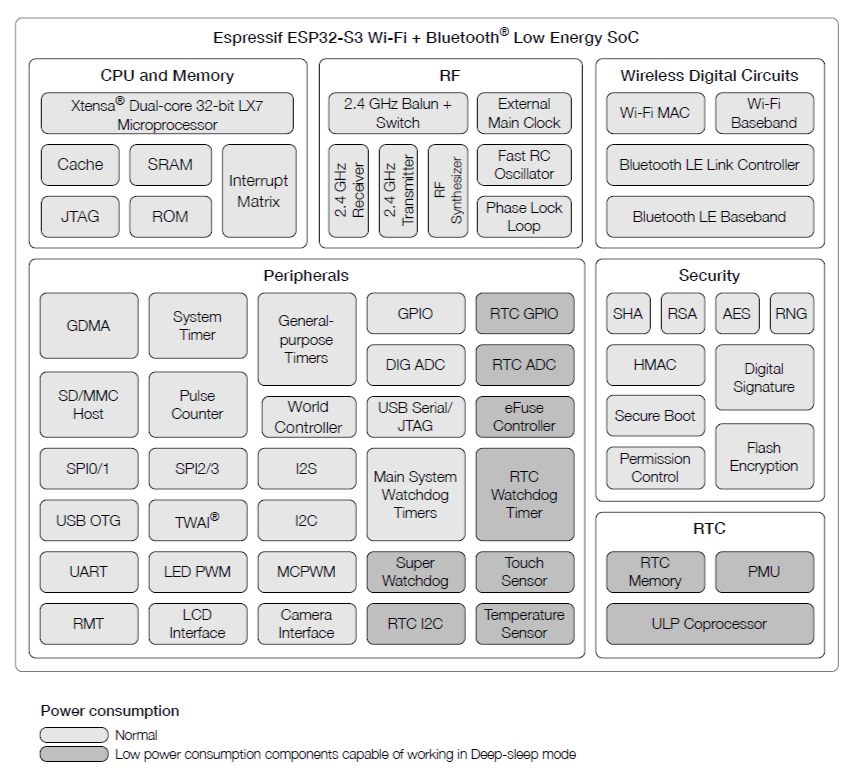
In the following image you can see the **functional diagram of the ESP32-S3** with all the peripherals it incorporates:
 In addition to its power and versatility, we have integrated it into the Kode Dot expanding its capabilities with **32MB of flash** and **8MB of PSRAM.** Thus, it makes honor to its status as the **best maker device on the market** and executing programs much larger and more complex.
| Feature | Description |
| ------- | --------------------------------------- |
| Flash | External memory of **32MB by Octalbus** |
| PSRAM | Internal memory of **8MB by Octalbus** |
## Antenna
Inside the Kode Dot we have integrated a **2.4GHz antenna** in the PCB. With this antenna you will be able to use the **WiFi** and **Bluetooth LE** of the ESP32-S3, as well as **ESP-NOW** and other communication protocols that work in this frequency band.
## Programming
**Programming the Kode Dot is done like any other ESP32-S3-based board.** Connect it directly to your computer using the USB-C cable and start uploading your code.
In the [Applications](/en/kodeOS/apps) section it is explained in detail how to upload code and create applications.
Internally, the **USB-C data lines** are connected to the **GPIO19 and GPIO20** pins to use the internal USB-Serial peripheral.
With the USB-C, you also have the option to use the internal **USB Serial/JTAG** peripheral that the ESP32-S3 incorporates to **flash and debug the Kode Dot.**
For the most advanced, you can use the **GPIO39, GPIO40, GPIO41 and GPIO42** pins of the **top connector of the Kode Dot** to debug a program using an **external JTAG interface.**
## State control
The control of the **BOOT** and **RESET** states of the ESP32-S3 is performed using simple combinations with the **buttons of the Kode Dot.**
### RESET
To reset the Kode Dot, you must press the **left button of the pad** at the same time as you press the **bottom button.** This is useful in these cases:
* When a program has been **flashed** and the Kode Dot is **locked.**
* To **exit an application** and return to the main menu.
### BOOT
To enter the Kode Dot in BOOT mode, while holding the **top button,** the Kode Dot must be reset following the RESET combination.
It is likely that you will not have to use this process since if the code you upload to the Kode Dot blocks or makes the ESP32-S3 restart, the Kode Dot will return to the main menu automatically.
## Example code
With this code you can get the **MAC address** of the different interfaces of the ESP32-S3.
```cpp esp32s3_info.ino lines icon="microchip" theme={null}
/**
* Displays ESP32-S3 microcontroller information via serial port.
* Includes model, revision, number of cores, and Chip ID.
* Prints the data every 3 seconds.
*/
/* ───────── KODE | docs.kode.diy ───────── */
void setup() {
Serial.begin(115200); /* Starts serial communication at 115200 baud */
}
void loop() {
/* Prints ESP32 chip model and revision */
Serial.printf("ESP32 Chip model = %s Rev %d\n", ESP.getChipModel(), ESP.getChipRevision());
/* Prints the number of cores in the chip */
Serial.printf("This chip has %d cores\n", ESP.getChipCores());
/* Prints the chip's unique identifier */
Serial.print("Chip ID: ");
Serial.println(ESP.getEfuseMac());
/* Waits 3 seconds before repeating */
delay(3000);
}
```
## Download ofexamples
You can test the example codes using the Arduino IDE or the ESP-IDF IDE or download the codes in our drive:
[ESP32-S3 examples](https://drive.google.com/drive/folders/11FnC9pj8qADzXAlg8xAT0knNWh9bgYV6)
In addition to its power and versatility, we have integrated it into the Kode Dot expanding its capabilities with **32MB of flash** and **8MB of PSRAM.** Thus, it makes honor to its status as the **best maker device on the market** and executing programs much larger and more complex.
| Feature | Description |
| ------- | --------------------------------------- |
| Flash | External memory of **32MB by Octalbus** |
| PSRAM | Internal memory of **8MB by Octalbus** |
## Antenna
Inside the Kode Dot we have integrated a **2.4GHz antenna** in the PCB. With this antenna you will be able to use the **WiFi** and **Bluetooth LE** of the ESP32-S3, as well as **ESP-NOW** and other communication protocols that work in this frequency band.
## Programming
**Programming the Kode Dot is done like any other ESP32-S3-based board.** Connect it directly to your computer using the USB-C cable and start uploading your code.
In the [Applications](/en/kodeOS/apps) section it is explained in detail how to upload code and create applications.
Internally, the **USB-C data lines** are connected to the **GPIO19 and GPIO20** pins to use the internal USB-Serial peripheral.
With the USB-C, you also have the option to use the internal **USB Serial/JTAG** peripheral that the ESP32-S3 incorporates to **flash and debug the Kode Dot.**
For the most advanced, you can use the **GPIO39, GPIO40, GPIO41 and GPIO42** pins of the **top connector of the Kode Dot** to debug a program using an **external JTAG interface.**
## State control
The control of the **BOOT** and **RESET** states of the ESP32-S3 is performed using simple combinations with the **buttons of the Kode Dot.**
### RESET
To reset the Kode Dot, you must press the **left button of the pad** at the same time as you press the **bottom button.** This is useful in these cases:
* When a program has been **flashed** and the Kode Dot is **locked.**
* To **exit an application** and return to the main menu.
### BOOT
To enter the Kode Dot in BOOT mode, while holding the **top button,** the Kode Dot must be reset following the RESET combination.
It is likely that you will not have to use this process since if the code you upload to the Kode Dot blocks or makes the ESP32-S3 restart, the Kode Dot will return to the main menu automatically.
## Example code
With this code you can get the **MAC address** of the different interfaces of the ESP32-S3.
```cpp esp32s3_info.ino lines icon="microchip" theme={null}
/**
* Displays ESP32-S3 microcontroller information via serial port.
* Includes model, revision, number of cores, and Chip ID.
* Prints the data every 3 seconds.
*/
/* ───────── KODE | docs.kode.diy ───────── */
void setup() {
Serial.begin(115200); /* Starts serial communication at 115200 baud */
}
void loop() {
/* Prints ESP32 chip model and revision */
Serial.printf("ESP32 Chip model = %s Rev %d\n", ESP.getChipModel(), ESP.getChipRevision());
/* Prints the number of cores in the chip */
Serial.printf("This chip has %d cores\n", ESP.getChipCores());
/* Prints the chip's unique identifier */
Serial.print("Chip ID: ");
Serial.println(ESP.getEfuseMac());
/* Waits 3 seconds before repeating */
delay(3000);
}
```
## Download ofexamples
You can test the example codes using the Arduino IDE or the ESP-IDF IDE or download the codes in our drive:
[ESP32-S3 examples](https://drive.google.com/drive/folders/11FnC9pj8qADzXAlg8xAT0knNWh9bgYV6)